How to Deploy a JBoss Cluster with Ansible Pt. 2
Ansible Roles help us make our playbooks simple, reusable, and easy to share.


Welcome back! In part one, we saw how Ansible automates our infrastructure setup and saves us a ton of time.
We defined our target hosts in an inventory file, specified our steps in a playbook, and configured a load balancer in minutes — not hours.
But we don't quite have a full environment yet.
Creating Playbooks for Entire Environments
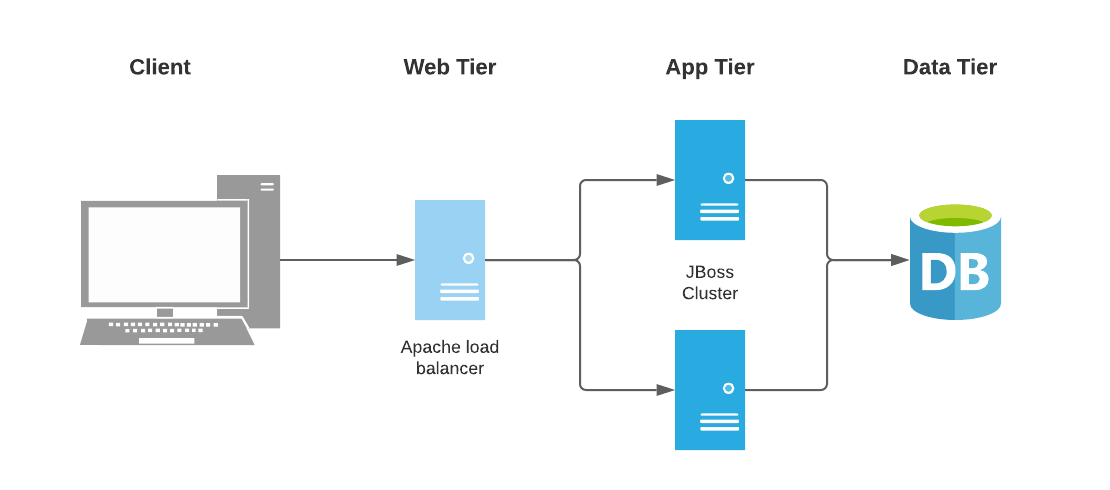
In this part, we’ll create an Ansible playbook to set up two JBoss EAP nodes. When we’re done, we’ll be able to set up the JBoss cluster below in one command. Let’s go!
What You’ll Need
- Ansible Installation
- Docker Installation & Docker Hub Account
- Basic linux knowledge
Step 1: Update Our Target Hosts
First, open the finished project from part one. Or, you can download it here. This has a playbook, inventory (host) file, and a load balancer config.
Open the host file. You should see something like this:
[webservers]
apache ansible_connection=docker
We have a single load balancer defined in a group called webservers. Add two EAP nodes to the host file:
[webservers]
apache ansible_connection=docker

[appservers]
eap1 ansible_connection=docker
eap2 ansible_connection=docker
Like in part one, we’re using docker containers because it's quicker than you spinning up giant VMs for this tutorial. In a regular setup, you’d provide the IP or fully qualified hostname and ansible will work over SSH. Like this:
eap1 ansible_host=10.28.31.161Step 2: Create a JBoss EAP Playbook
First, download the JBoss EAP zip to our project directory. You don’t need to extract it -- we’ll use this to install the server on our nodes.
In the project directory, create a file called eap_playbook.yml and add this:
---
- name: Configure EAP Server
  hosts: appservers
  ## Uncomment line below if you're not using docker
  #become: true
This playbook will set up our EAP nodes. Our first play is named “Configure EAP Server” and will run on the hosts we defined in step one.
Add some variables right under the host section (watch the indents!):
  vars: jboss_eap_user: jboss-eap
    jboss_eap_group: jboss-eap
    eap_deploy_dir: /opt
    eap_version: 7.3
    eap_archive: jboss-eap-7.3.0.zip
    eap_home: "{{ eap_deploy_dir }}/jboss-eap-{{eap_version}}"
    rhel_initd: /etc/init.d
    jboss_eap_service_conf_dir: "/etc/default"
Instead of manually typing these values over and over, we’ll reference these for configuration values.
Now we’ll define tasks to setup JBoss EAP from a base RHEL installation. Right below the variables section, add a task to install some system requirements.
  tasks:
    - name: Install JBoss Requirements
      dnf:
        name: java-1.8.0-openjdk-devel, unzip, initscripts, hostname
        state: present
These packages will allow us to extract JBoss, run the JVM, and configure it as a system service.
Next, add a task to check if JBoss exists:
    - name: Check if Service Exists
      stat: path=/etc/init.d/jboss-eap-rhel.sh
      register: service_status

    - name: Ensure EAP service is stopped
      when: service_status.stat.exists
      ignore_errors: yes
      service:
        name: jboss-eap-rhel
        state: stopped
Ansible playbooks are designed to be idempotent. When you run them repeatedly, you should get the same result. Before we continue, the tasks above ensure that all nodes aren't already running JBoss.
Next, create a JBoss user and group:
    - name: Create JBoss EAP Group
      group:
        name: "{{ jboss_eap_group }}"
        system: yes
        state: present
        gid: "{{ jboss_eap_group_gid | default('400') }}"

    - name: Create JBoss EAP User
      user:
        name: "{{ jboss_eap_user }}"
        comment: "JBoss EAP User"
        uid: "{{ jboss_eap_user_uid | default('400') }}"
        group: "{{ jboss_eap_group }}"
        home: "{{ eap_deploy_dir }}"
And add tasks to extract JBoss:
    - name: Clean EAP directory
      file:
        state: absent
        path: "{{ eap_home }}/"

    - name: Unarchive EAP
      unarchive:
        src: "{{ eap_archive }}"
        dest: "{{ eap_deploy_dir }}"
        owner: "{{ jboss_eap_user }}"
        group: "{{ jboss_eap_group }}"
Here, we check to see if EAP has already been extracted. If it has, we’ll clean it up. Then we’ll extract a new installation to eap_deploy_dir.
Next, add a task to create a symlink:
    - name: Create symlink
      file:
        src: "{{eap_home}}"
        dest: "/opt/jboss-eap"
        state: link
This task links /opt/jboss-eap to our extracted installation (/opt/jboss-eap-7.3). When the version of EAP changes, it’ll be nice to know that the path to this is always /opt/jboss-eap.
Next, we’ll set up some files that will allow us to start JBoss EAP as a service. Add the following tasks:
    - name: Modify JBoss EAP Configuration File
      lineinfile:
        state: present
        path: "{{ eap_home }}/bin/init.d/jboss-eap.conf"
        regexp: "{{ item.regexp }}"
        line: "{{ item.line }}"
      with_items:
        - {regexp: "^# JBOSS_USER=", line: "JBOSS_USER=jboss-eap"}
        - {regexp: "^# JBOSS_CONFIG=", line: "JBOSS_CONFIG=standalone-ha.xml"}
        - {regexp: "^# JBOSS_OPTS=", line: "JBOSS_OPTS=\"-b 0.0.0.0 -bprivate `hostname -i` -Djboss.node.name={{ inventory_hostname }}\""}

    - name: Copy JBoss Service Configuration File
      copy:
        src: "{{ eap_home }}/bin/init.d/jboss-eap.conf"
        dest: "{{ jboss_eap_service_conf_dir }}/"
        remote_src: True
        owner: "{{ jboss_eap_user }}"
        group: "{{ jboss_eap_group }}"

    - name: Copy JBoss EAP Service File
      copy:
        src: "{{ eap_home }}/bin/init.d/jboss-eap-rhel.sh"
        dest: "{{ rhel_initd }}"
        remote_src: True
        owner: "{{ jboss_eap_user }}"
        group: "{{ jboss_eap_group }}"
        mode: 0755
The first task sets the server's default user, running mode, and binds it to all network interfaces. The other tasks copies script and configuration files that we’ll use to run the service.
remote_src tells Ansible to copy the folder from the remote host instead of our machine.
Finally, add tasks to start the service and deploy a sample app:
    - name: Enable EAP service
      service:
        name: jboss-eap-rhel.sh
        enabled: yes

    - name: Start EAP service
      service:
        name: jboss-eap-rhel
        state: started
Nice Work! If all went well, this playbook should configure a base RHEL system as an EAP server.
Step 3: Organize Playbooks with Roles
As we add more playbooks and configuration files to our project, it'll get pretty messy.
Ansible Roles make it easy to organize our playbooks. A role is a way to package ansible code in a reusable and structured way. Each role configures a system for a purpose. We’ll create two roles: one to set up the apache load balancer, and one to set up EAP.
In our project directory, create a role folder:
mkdir rolesThen, create a role for EAP and apache inside the roles folder:
ansible-galaxy init roles/eap && \
ansible-galaxy init roles/apache
Ansible Galaxy allows us to create a role with one command. You’ll see a few folders inside each role. Here are the ones we’ll use:
- tasks: list of tasks executed by this role
- vars: stores variables used by this role
You can ignore the others. For more information on role structure, see this.
Open eap_playbook.yml and move everything under the tasks section to roles/eap/tasks.main.yml. When you're done, that file should look like this:
---
- name: Install JBoss Requirements
  dnf:
    name: java-1.8.0-openjdk-devel, unzip, initscripts
    state: present

- name: Check if Service Exists
  stat: path=/etc/init.d/jboss-eap-rhel.sh
  register: service_status

- name: Ensure EAP service is stopped
  when: service_status.stat.exists
  ignore_errors: yes
  service:
    name: jboss-eap-rhel
    state: stopped

- name: Create JBoss EAP Group
  group:
    name: "{{ jboss_eap_group }}"
    system: yes
    state: present
    gid: "{{ jboss_eap_group_gid | default('400') }}"

- name: Create JBoss EAP User
  user:
    name: "{{ jboss_eap_user }}"
    comment: "JBoss EAP User"
    uid: "{{ jboss_eap_user_uid | default('400') }}"
    group: "{{ jboss_eap_group }}"
    home: "{{ eap_deploy_dir }}"

- name: Clean EAP directory
  file:
    state: absent
    path: "{{ eap_home }}/"

- name: Unarchive EAP
  unarchive:
    src: "{{ eap_archive }}"
    dest: "{{ eap_deploy_dir }}"
    owner: "{{ jboss_eap_user }}"
    group: "{{ jboss_eap_group }}"

- name: Create symlink
  file:
    src: "{{eap_home}}"
    dest: "/opt/jboss-eap"
    state: link

- name: Modify JBoss EAP Configuration File
  lineinfile:
    state: present
    path: "{{ eap_home }}/bin/init.d/jboss-eap.conf"
    regexp: "{{ item.regexp }}"
    line: "{{ item.line }}"
  with_items:
    - {regexp: "^# JBOSS_USER=", line: "JBOSS_USER=jboss-eap"}
    - {regexp: "^# JBOSS_CONFIG=", line: "JBOSS_CONFIG=standalone-ha.xml"}
    - {regexp: "^# JBOSS_OPTS=", line: "JBOSS_OPTS=\"-b 0.0.0.0 -bprivate `hostname -i` -Djboss.node.name={{ inventory_hostname }}\""}


- name: Copy JBoss Service Configuration File
  copy:
    src: "{{ eap_home }}/bin/init.d/jboss-eap.conf"
    dest: "{{ jboss_eap_service_conf_dir }}/"
    remote_src: True
    owner: "{{ jboss_eap_user }}"
    group: "{{ jboss_eap_group }}"

- name: Copy JBoss EAP Service File
  copy:
    src: "{{ eap_home }}/bin/init.d/jboss-eap-rhel.sh"
    dest: "{{ rhel_initd }}"
    remote_src: True
    owner: "{{ jboss_eap_user }}"
    group: "{{ jboss_eap_group }}"
    mode: 0755

- name: Enable EAP service
  service:
    name: jboss-eap-rhel.sh
    enabled: yes

- name: Start EAP service
  service:
    name: jboss-eap-rhel
    state: started
Make sure to watch the indents! YAML uses two spaces and is quite fussy when you don't.
Do the same thing for the apache tasks . Move the tasks in site.yml to apache/tasks/main.yml. That file should look like this:
---
- name: Check if HTTPD Service Exists
  stat: path=/etc/httpd
  register: service_status

- name: Ensure HTTPD service is stopped
  when: service_status.stat.exists
  service:
    name: httpd
    state: stopped

- name: Create Apache Group
  group:
    name: "{{ apache_group }}"
    system: yes
    state: present
    gid: "48"

- name: Create Apache User
  user:
    name: "{{ apache_user }}"
    comment: "Apache User"
    uid: "48"
    group: "{{ apache_group }}"
    state: present

- name: Install HTTPD & Helpful Tools
  dnf:
    name: httpd, unzip, wget
    state: present

- name: Unarchive mod cluster
  unarchive:
    src: https://github.com/modcluster/mod_cluster/releases/download/1.3.1.Final/mod_cluster-1.3.1.Final-linux2-x64-so.tar.gz
    dest: /etc/httpd/modules
    remote_src: yes

- name: Copy Mod Cluster Config
  copy:
    src: "mod_cluster.conf"
    dest: "/etc/httpd/conf.d/"

- name: Remove Proxy Balancer Module
  lineinfile:
    state: present
    path: "/etc/httpd/conf.modules.d/00-proxy.conf"
    regexp: "LoadModule proxy_balancer_module modules/mod_proxy_balancer.so"
    line: "#LoadModule proxy_balancer_module modules/mod_proxy_balancer.so"

- name: Enable HTTPD
  service:
    name: httpd
    enabled: yes

- name: Start HTTPD
  service:
    name: httpd
    state: started
We’ll also move our variables to the corresponding directories. Here's what those two files should look like.
roles/eap/vars/main.yml
---
jboss_eap_user: jboss-eap
jboss_eap_group: jboss-eap
eap_deploy_dir: /opt
eap_version: 7.3
eap_archive: jboss-eap-7.3.0.zip
eap_home: "{{ eap_deploy_dir }}/jboss-eap-{{eap_version}}"
rhel_initd: /etc/init.d
jboss_eap_service_conf_dir: "/etc/default"
roles/apache/vars/main.yml
---
apache_user: apache
apache_group: apache
Step 4: Use Roles in the Playbook
Now we’ll create a master playbook that will use our roles to configure our environment. Open site.yml and delete everything but these lines:
---
- name: Configure Apache Web Server
  hosts: webservers
Then, add a roles section with one item called apache:
---
- name: Configure Apache Web Server
  hosts: webservers
  roles:
    - apache
This syntax tells Ansible to configure our webservers using the apache role. Now we'll create a play to configure EAP on our nodes.
Add this play below the first one:
- name: Configure JBoss EAP Server
  hosts: appservers
  roles:
    - eap
Finally, move installation files to the their directories and cleanup any extra files. In your project directory, type this:
rm -f eap_playbook.yml && \
mv jboss-eap-*.zip ./roles/eap/files/ && \
mv mod_cluster.conf ./roles/apache/files
Omitting unused folders, your directory structure should look like this:
├── hosts
├── roles
│   ├── apache
│   │   ├── README.md
│   │   ├── files
│   │   │   └── mod_cluster.conf
│   │   ├── tasks
│   │   │   └── main.yml
│   │   └── vars
│   │       └── main.yml
│   └── eap
│       ├── README.md
│       ├── files
│       │   └── jboss-eap-7.3.0.zip
│       ├── tasks
│       │   └── main.yml
│       └── vars
│           └── main.yml
└── site.yml
Well done. Clean, tidy and organized!
Step 5: Run the Playbook
We’re finally ready to run our playbook. First, spin up two jboss hosts.
docker run -dit \
--tmpfs /tmp --tmpfs /run \
-v /sys/fs/cgroup:/sys/fs/cgroup:ro \
--name=eap1 registry.access.redhat.com/ubi8/ubi-init

docker run -dit \
--tmpfs /tmp --tmpfs /run \
-v /sys/fs/cgroup:/sys/fs/cgroup:ro \
--name=eap2 registry.access.redhat.com/ubi8/ubi-init
Again, we’re using containers so you have a quick environment to spin up and tear down for this tutorial. You can host your ansible nodes anywhere: the cloud, bare metal, local VMs etc.
Now, start the apache host:
docker run -dit \
--tmpfs /tmp --tmpfs /run \
-v /sys/fs/cgroup:/sys/fs/cgroup:ro \
-p 80:80 -p 8001:6666 -p 23364:23364/udp \
--name=apache registry.access.redhat.com/ubi8/ubi-init
Finally, run our playbook. In your playbook directory, type the following:
ansible-playbook -i hosts site.ymlIf the playbook runs successfully, you should an output like this:
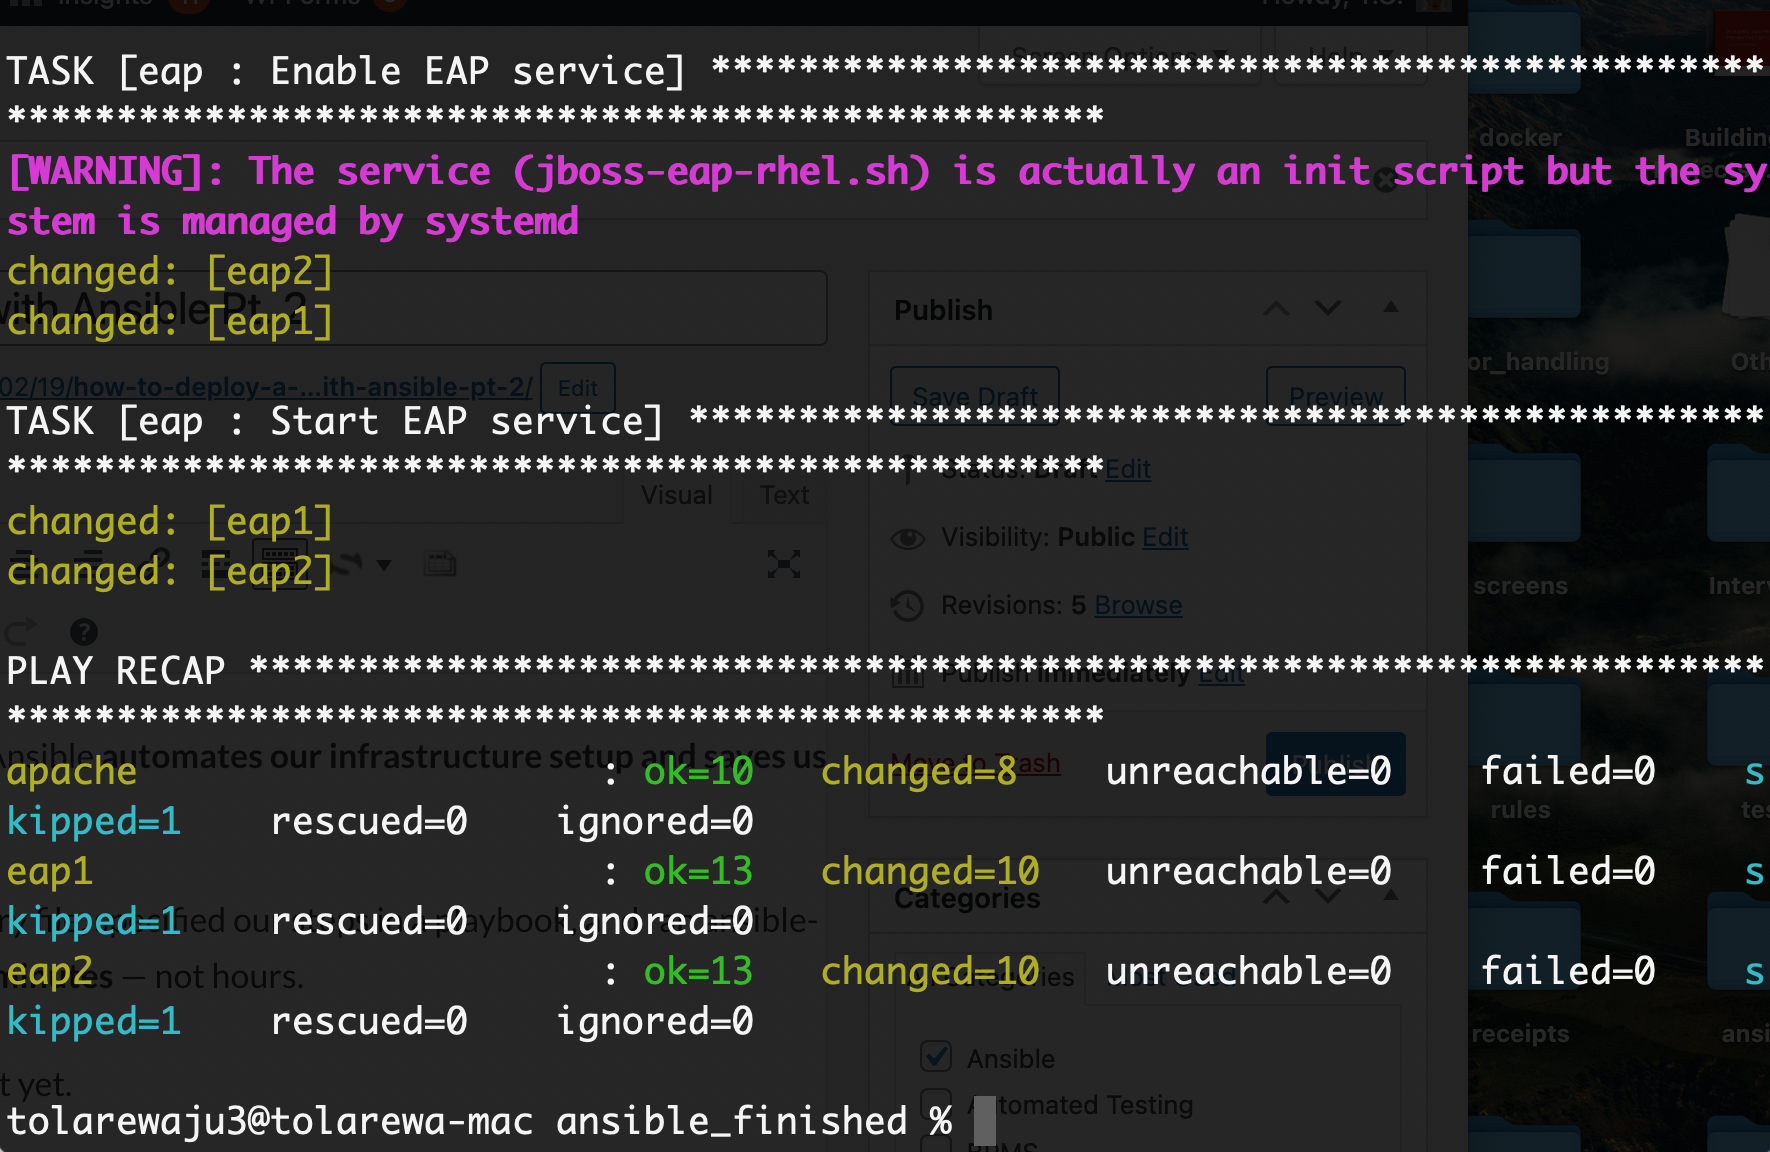
Let’s verify that our load balancer is running. Navigate to http://localhost:8001/mod_cluster_manager. You should see this page.
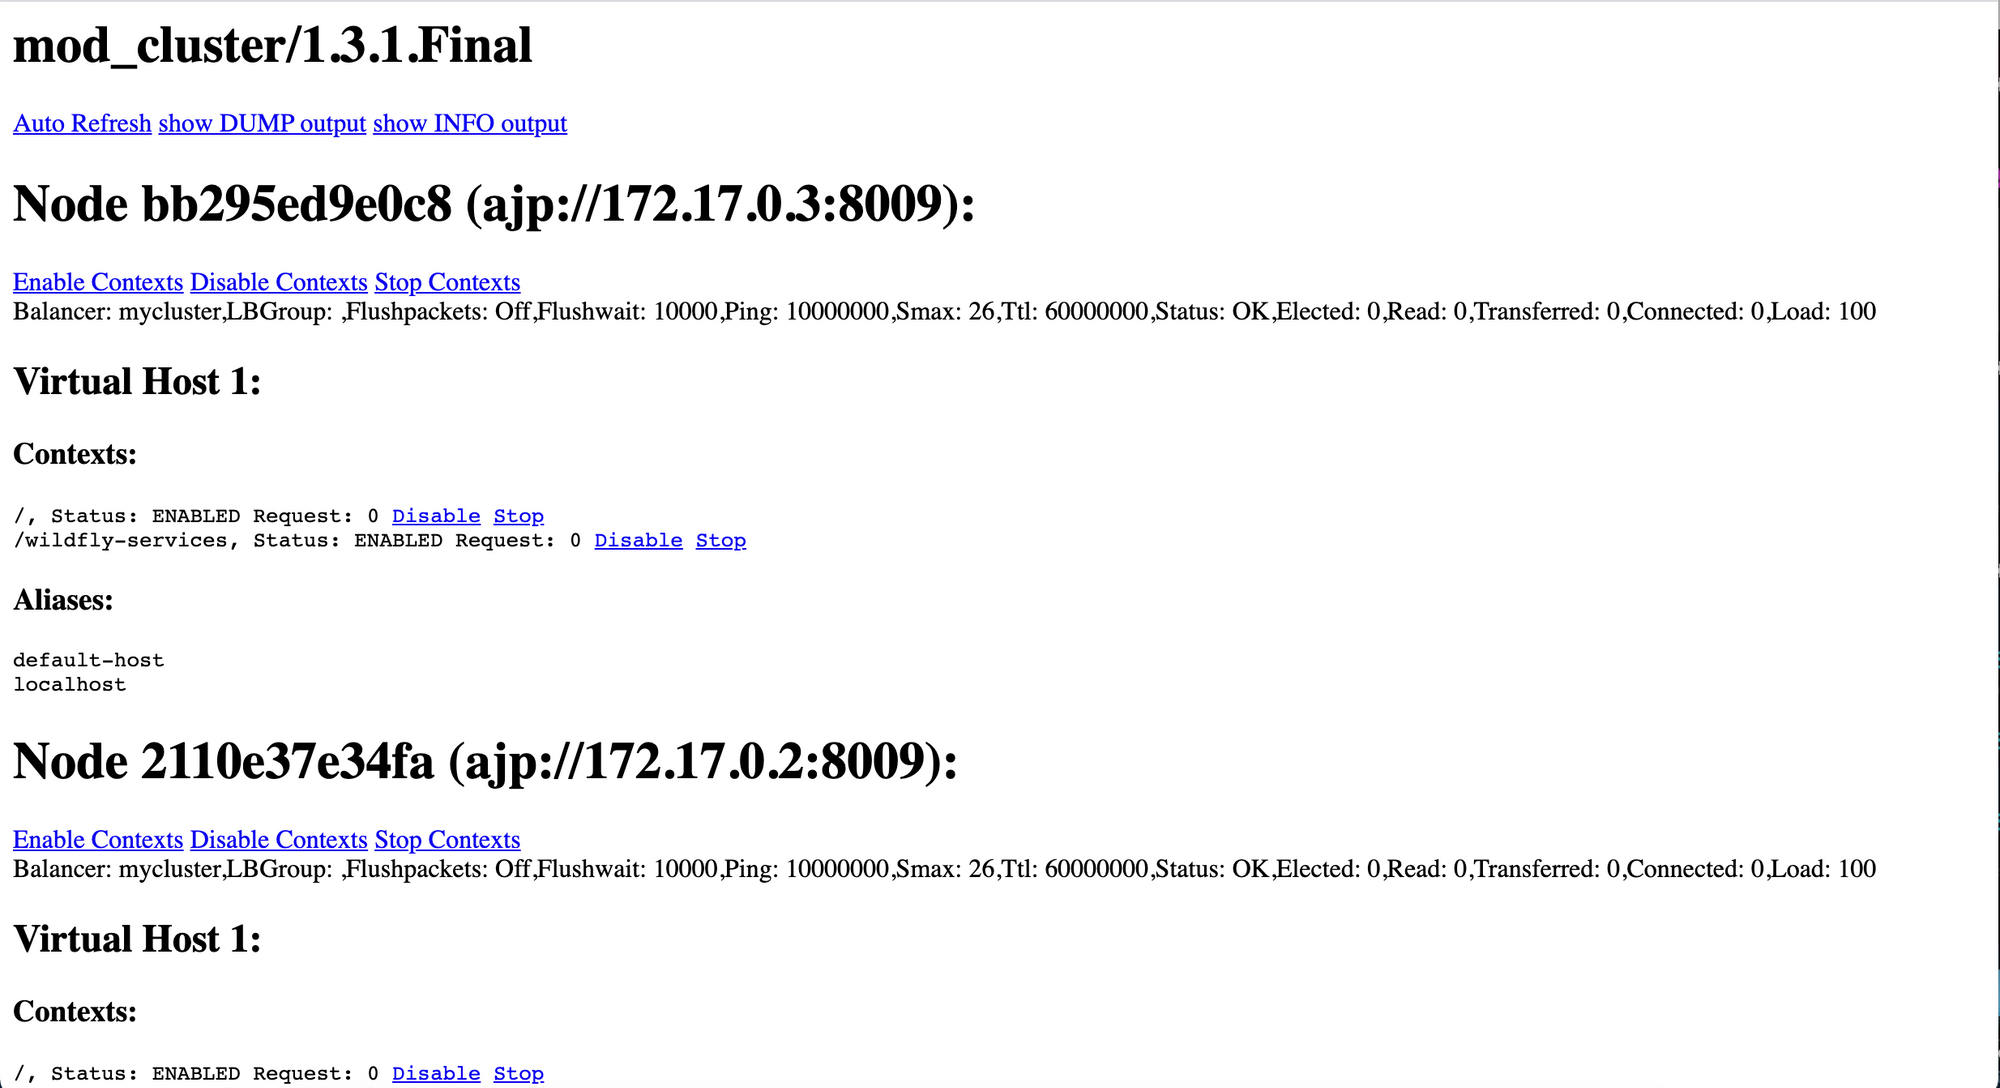
Our two jboss nodes have been registered with the load balancer.
To clean up, stop the containers:
docker rm -f apache eap1 eap2Best Practices
If your playbooks are too complex (or you define the same plays repeatedly), you should create a role. Ansible Roles make playbooks simple, reusable, and easy to share.
Recap
In this tutorial, we learned how to deploy an entire JBoss cluster with ansible. Last time, we saw how Ansible helps us automate our entire infrastructure. And today, we learned how to organize multiple playbooks into roles. Now we can configure an entire JBoss cluster in one command.
Project Code & Links
- Finished Ansible Project (Note: You will still need to download the JBoss zip into the project directory. It's not included in the finished project)
- Intro to roles
- How Ansible Roles solve confusion
Happy Coding!
-T.O.