Camel-K: Integrate Systems Without Breaking the Bank
Camel-K helps us integrate systems in an easy, simple, and cost effective way. Do more with less.

Do more with less.
That’s the goal for everyone right now. But every company also has to integrate with multiple systems to get their job done.
And that’s expensive.
Integrations can be difficult to develop, complex to manage, and inefficient to run. It's the opposite of what you want in a recession
So if we’re trying to do more with less, integration is a great place to start.
Why do we use Camel K?
Camel K is an integration platform built for Kubernetes. It an easy, simple, and cost effective way to connect two systems.
Camel-K comes with over 150+ pre-built connectors for integrating anything from databases, message queues, or even Twitter.
But unlike regular integration platforms, Camel K is designed for Serverless. We only pay for what we need. Which means we can save a lot of money when our integrations aren’t running.
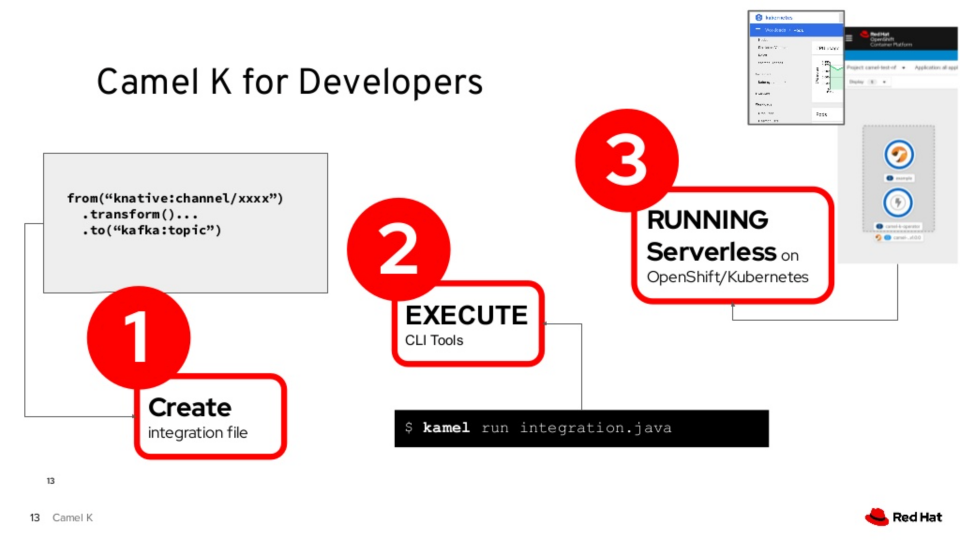
How do we use Camel K?
What You’ll Need
- OpenShift Cluster w/ admin rights
- Kamel cli
- Knative cli
- hey load generator
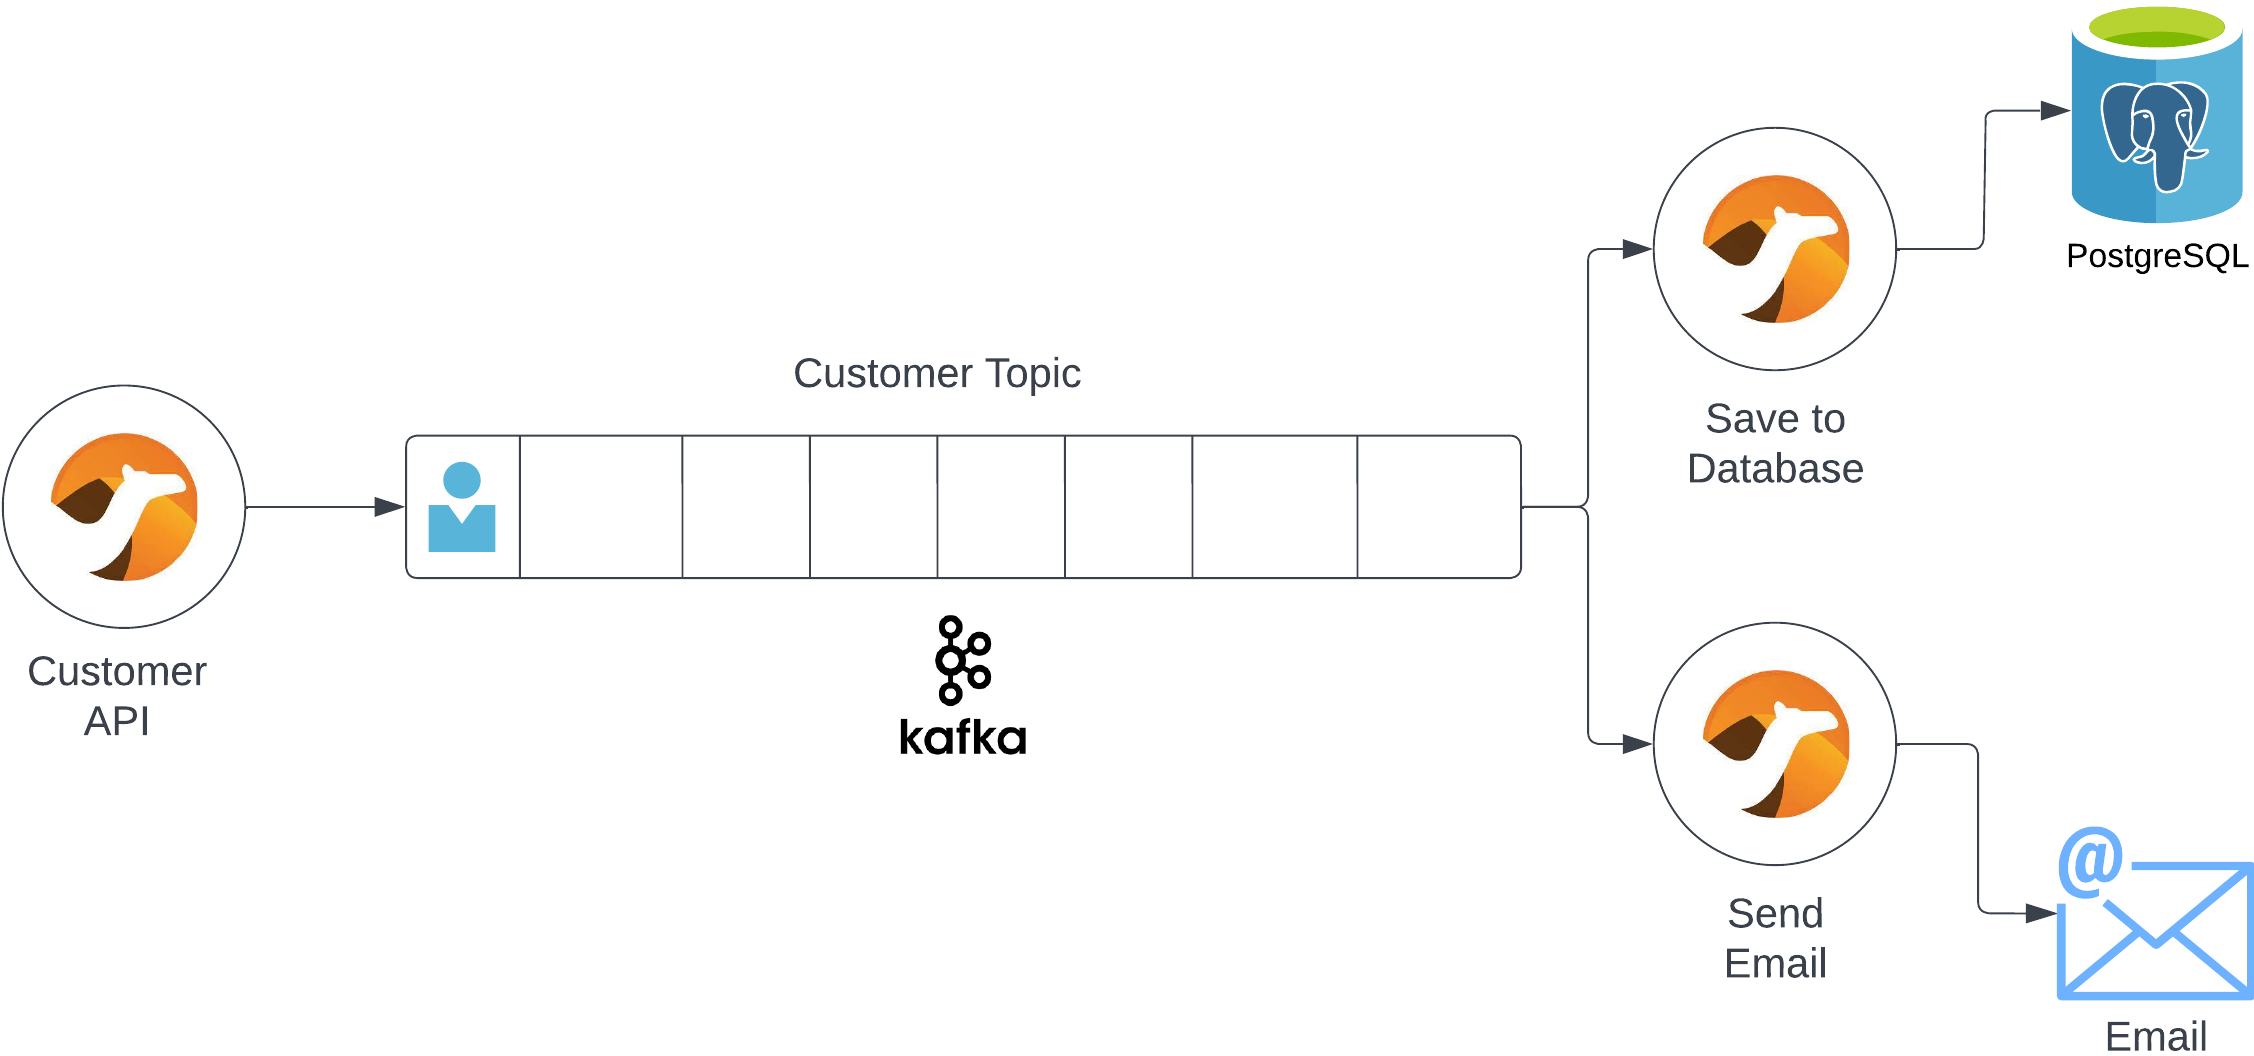
Many systems are usually involved when a new customer signs up. Using a few integrations, we’ll create a customer sign up flow that saves their information to a database and sends them a welcome message.
Step 1: Configure Our Environment
Our environment includes Kafka, a PostgreSQL database, and of course, Camel-K. So first, we’ll set up our environment.
Clone the starter project.
git clone git@github.com:tolarewaju3/camel-k-serverless.git
cd camel-k-serverless && git switch starter
In the config folder, there are files that will configure components in our environment. Here’s what these files will set up.
- Camel K Operator - adds Camel K functionality to OpenShift
- Serverless Operator - adds auto scaling capabilities to our integrations
- AMQ Streams - adds Kafka event stream functionality to OpenShift
Create a new OpenShift project and configure our environment.
oc login -u <username> -p <password> <cluster-url>
oc new-project camel-k
oc apply -f config/
Check to make sure the components are installed correctly.
oc get csv
You should see three operators in the “Succeeded” state. Now, we’ll finish configuration by setting up:
- A Kafka Broker - servers to handle kafka messaging
- A Kafka topic called `signups` - to send our new customers signups to
- Knative Serving
In your terminal, type: oc apply -f post-config/
Now, we’ll create a PostgreSQL database.
oc new-app \
	-e POSTGRESQL_USER=camelk \
	-e POSTGRESQL_PASSWORD=camelk \
	-e POSTGRESQL_DATABASE=customerdb \
	postgresql
Next, we’ll create a customer table to hold that data. Find the postgres pod (the one without the "-deploy") and create a remote shell into it.
oc get pods | grep postgres
oc rsh <postgres_pod_name>
Login to the database. The password is camelk.
psql -U camelk -W customerdb
Create a customer table.
CREATE TABLE customer (
    id SERIAL PRIMARY KEY,
    firstName varchar(255),
    lastName varchar(255),
    email varchar(255)
);
Type exit twice to get back to your terminal.
Step 2: Create the Customer API
We’ll create a customer signup API. When this endpoint gets hit, it’ll place new user data onto the Kafka topic we created.
In our project code, open CustomerAPI.java.
Here we'll create a route. Routes help us define integration between a source (from) and a destination (to).
Inside the configure method, create a rest API route.
    @Override
    public void configure() throws Exception {

        rest("/")
            .post("/newCustomer")
                .consumes("application/json")
                .to("direct:sendToKafka");
    }
This automatically exposes a REST API with an endpoint called newCustomer. It'll take in a JSON dictionary and send it to another route called sendToKafka.
After our REST route, create a route called sendToKafka
    @Override
    public void configure() throws Exception {

        rest("/")
            .post("/newCustomer")
                .consumes("application/json")
                .to("direct:sendToKafka");

        from("direct:sendToKafka")
                .log("${body}")
                .log("Sending message to kafka")
                .to("kafka:signups?brokers=my-cluster-kafka-bootstrap.camel-k.svc:9092");
    }
Save the file. This route takes the message from sendToKafka, logs it, and forwards it to our Kafka broker. The Kafka Camel component makes it easy to communicate with Kafka.
Open the project directory in your terminal and run the integration.
kamel run \
	--trait knative-service.enabled=true \
	--trait knative-service.autoscaling-target=10 \
	CustomerAPI.java --dev
This tells our integration to run as a Knative Service – which automatically adds autoscaling to our integration. We also set the target number of concurrent requests to ten.
You should see the integration running message in your terminal.
Integration "customer-api" in phase "Running"
Step 3: Create a Database Integration
We’ve created an API that takes in customer data and forwards it to a kafka topic. Now we’ll grab that message off our topic and save the user information.
Open SaveCustomer.java and create the database integration.
    @Override
    public void configure() throws Exception {
        from("kafka:signups?brokers=my-cluster-kafka-bootstrap.camel-k.svc:9092")
            .unmarshal().json()
            .log("Saving new customer: ${body[firstname]} ${body[lastname]} with email: ${body[email]}")
            .setBody(simple("INSERT INTO customer (firstname, lastname, email) VALUES ('${body[firstname]}', '${body[lastname]}', '${body[email]}')"))
            .to("jdbc:default")
            .to("log:info");
    }
This route takes the message from Kafka, converts it to json, logs a message, and saves a customer to the database. The jdbc connector makes it really easy to connect to databases.
Save the file. In another terminal, run our integration.
DB_URL=jdbc:postgresql://postgresql:5432/customerdb

kamel run \
	-p quarkus.datasource.db-kind=postgresql \
	-p quarkus.datasource.jdbc.url=$DB_URL \
	-p quarkus.datasource.username=camelk \
	-p quarkus.datasource.password=camelk \
	SaveCustomer.java --dev
Here we’re passing in our database connection string as properties. For production, you should create this as a secret and reference it.
Wait until you see the integration running.
Step 4: Create an Email Integration
We’ll create an integration to send our new customer a welcome email.
In the real world, we’d use the mail component or a mail REST API. But for our purposes, this will just log the email to the console.
Open SendEmail.java and add a route.
    @Override
    public void configure() throws Exception {

        from("kafka:signups?brokers=my-cluster-kafka-bootstrap.camel-k.svc:9092")
            .unmarshal().json()
            .log("Sending message to new customer: ${body[firstname]}\n")
            .log("To:${body[email]}\nSubject: Welcome to NewCo\nHello ${body[firstname]}, we're so glad you joined us here at NewCo ");

    }
This route consumes the Kafka message, converts it to an object, and creates a welcome email from the customer attributes.
Run the integration: kamel run SendEmail.java
Step 5: Generate Load
First, get the route url for our Customer API.
URL=`kn service describe customer-api -o url`Now, send one request to our API.
curl -X POST -d '{"firstname": "George", "lastname": "Jefferson", "email": "gjeffers@gmail.com"}' -H 'Content-Type: application/json' "$URL/newCustomer"You should see this in your Customer API terminal.
(executor-thread-0) {"firstname": "George", "lastname": "Jefferson", "email": "gjeffers@gmail.com"}Now, we’ll generate some load to our application. Navigate to the OpenShift web console and open the camel-k project.

Generate load to our Customer service.
URL=`kn service describe customer-api -o url`

hey -q 50 -z 60s -m POST -d '{"firstname": "TiOluwa", "lastname": "Olarewaju", "email": "tolarewaju3@gmail.com"}' -T "application/json" "$URL/newCustomer"
For the next minute, this sends up to 50 requests per second to our Customer API.
You should see more customer api pods starting. As more requests come in, our service is scaling to meet the demand.
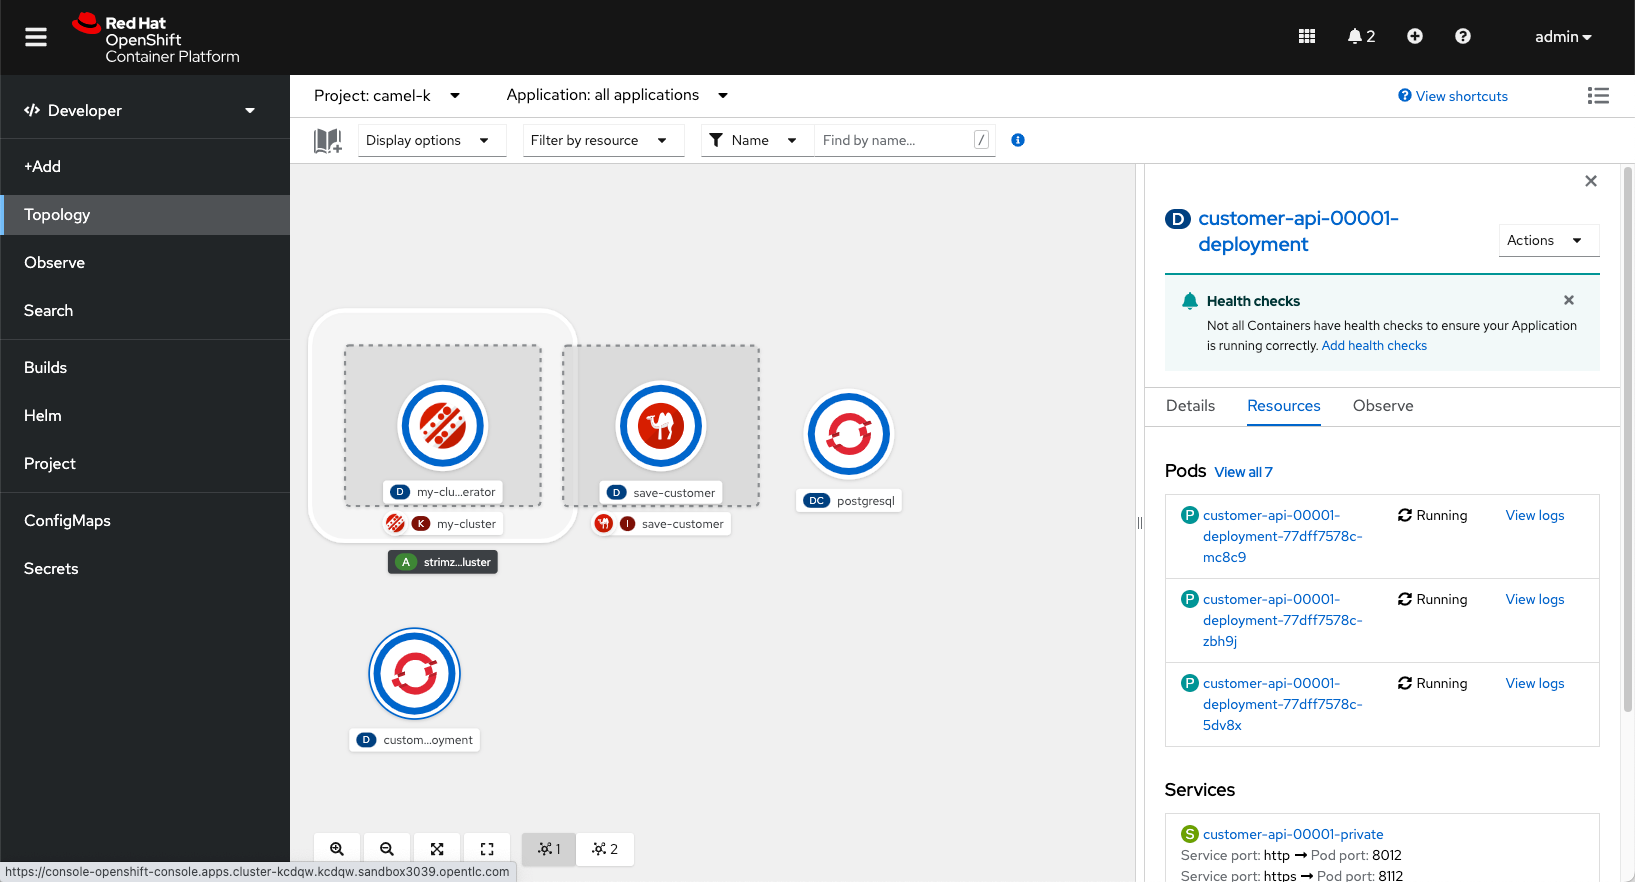
When this finishes, you should see the service scale back to zero. It’s like magic. This helps us save money when our integrations aren’t running.
Best Practices
When creating integrations with Camel-K, it’s best to keep them small. This makes it easy to scale pieces separately. It’s the same single responsibility principle we use in creating microservices.
Recap
Camel K helps us do more with less. It an easy, simple, and cost effective way to connect two systems. We can install Camel-K on any Kubernetes cluster and create small integrations that are easy to deploy and scale.
Project Code & Links
Happy Coding,
-T.O
